Showing posts with label Sewing. Show all posts

Tuesday, February 2, 2010

A birthday torch

My niece wanted a torch for her 3rd birthday so while I didn't think it was the most exciting present, I bought one for her. And I am so glad I did.


Rather than buy her a cheap and nasty kid's torch, I bought a plain silver, heavy duty torch.... much better suited to a busy 3 year old! I also thought this would be appealing as it was a "proper" torch. I made a carry case for it so it can be worn around her neck for easy access while exploring.


My niece loved the torch. She disappeared with her cousin after the party had finished and they were found hiding under a blanket with the torch. Just them, the torch and their imaginations.

Torches are definately on my birthday-present-list now. They are not expensive and encourage exploration and wonder. A perfect present for a little person discovering their world.


Wednesday, January 27, 2010

A pram for my boy

So I wrote a big long post wondering why we* are so comfortable giving dolls and prams to girls, but not to boys. But I decided it was too wordy and too long and I was having trouble articulating my thoughts.

So all I will say is that I have been thinking a lot lately about the toys my children play with and how I - and others - influence them with the toys we give them.

All this thinking started with a pram given to my girl for Christmas. When she is not busily pushing Horse here and there, my boy happily pushes Bug around the place. So when my sister offered me another pram, I happily took it for my boy. My girl's pram is pink so I thought I would change this one for my boy (or am I worried what "we" would think about my boy pushing a pink pram..???) so I replaced it with red and blue train fabric. My boy loves trains, as does my girl.


Then clearly on a parenting and sewing high, we went to get some jobs done and the kids took their prams. It was a fun but short trip... and we didn't get the jobs done! But I guess there is plenty of time for jobs.


*we: as in a big general "we". Of course there will be exceptions to the general we. I hope I can be one of them.

Wednesday, January 20, 2010

My Little Tulip

My girl is wearing a Tulip Dress, made from Nicole Mallalieu's new pattern. This dress is really sweet, with pleats on the front and back of the skirt, giving the dress its "tulip" shape.


The pattern is really detailed, with lots of techniques not often included in children's clothes. Nikki has done a brilliant job of explaining these techniques, together with step-by-step instructions, sewing tips and a heap of photos and diagrams.

Stay tuned to Nikki's blog for more info on when the 'Tulip Dress' pattern will be available.... it's very soon! And if you'd like to win a copy of her new pattern, Nikki's having a giveaway....


Tuesday, December 15, 2009

Woof woof, woof woof

It's full steam ahead in the 'Handmade Christmas Present Department' over here at MBC Headquarters. On the finished list is Poppy and her Puppies for my dog-assessed niece.


My Poppy has 4 puppies, including twins. I thought my niece would think this was pretty special as her mum is a twin and she has twin cousins.


There is also lots of discussions with my niece at the moment about families and how they are all different.... just making sense of her changing world and the world around her (as we are all trying to do I guess!). So joining Poppy and her puppies is Mr Poppy.


This cute pattern is an Audrey & Maude design available from here and here. I made Mr Poppy at 100% and Poppy and the puppies at 90% of the original pattern. The pattern says to use felt for the ears, tail and legs but a lack of appropriate coloured felt and a need to get started and finished, resulted in machine sewn bits.


And a big thankyou to all the good wishes you guys sent me about getting back to work. It was ridiculous how nervous I was! This motherhood thing can do wonders for your self confidence in some areas, but it can take a battering in others. Anyway, I am happy to report that within a few minutes, it was like I had never left. I even wondered at one point if I had actually had children! So it all went well and it looks like I'll be doing some more work in the new year.

Tuesday, December 1, 2009

Ready to play in the sun

It's all about hats, hats, hats round these parts at the moment. After making sure my friend's girls are ready for the sun, I finished off hats for my two kidlets.


Using Nicole Mallalieu's Kids Hat pattern again, these are made using lightweight denim with a band of fabric on the crown that matches the fabric used for the brim lining.


I've almost finished another two hats for a friend's kids and while I'm almost hatted out for this Summer, I can see my sewing skills have improved.... which is great for the next project....

Thursday, November 26, 2009

My Creative Space - Birthday Bunting

This week, it's about a birthday, a bunting and a new family tradition.

It was my Mr's birthday on Monday and a surprise arrival from Gina helped me make an idea that had been floating around in my head into something real .... a Birthday Bunting.


Each family has their own traditions, some we grew up with and some that begin with us. My Mum used to let us decide what was for dinner on our birthdays... this is a tradition I loved and look forward to carrying on with my children. And this bunting - that will be dragged out and hung for all our birthdays - is our new family tradition.

For more creative spaces, head over to visit Kirsty who needs a little TLC today.

Sunday, November 15, 2009

THE Suit

So when I first said it was a man-sized challenge, I wasn't wrong. It was a big ask. And there was a few hiccups along the way. But you know what, I think it worked.

Photo by Jamie Troi


Here's what I did (the short version**):

- removed the suit collar and added a larger, black collar
- cut some padding out of the shoulders
- removed the jacket pockets and zigzaged them closed
- cut off the buttons and button holes and added black panels to the front
- shortened the jacket and added a zipper
- thread sketeched buildings on the front of the jacket and on the bottom of the left leg of the pants
- sewed a black panel on the bottom of the right leg of the pants


Now before you go thinking I am the girl who cried wolf, panicking that first my top was ruined then worked out, and then that the suit was ruined then worked out.... this refashioning thing can be tricky. Satisfying but also very frustrating. I love the freedom of not sewing to a pattern but that can also be hard when something goes wrong. On both occasions, I really thought what I had done was beyond saving. So the lesson learnt for me is that I must not panic when refashioning. It is likely that things will turn ugly before falling into place.


So anyway, the gig was awesome and My Mr looked great! He loved the suit and even mentioned it on stage. I was very chuffed and even blushed a little!


** the long version involves removing the collar then sewing it up without a collar, making a round neck, collarless jacket that looked like something my mum would wear. Now my mum dresses well, but never ever do I want my husband to dress like my mother. So after lots of looking and thinking and cursing and then a fresh set of eyes, I cut the neckline deeper and added the black collar. And you know those black panels that were added to the front, that was because when I cut off the buttons and button holes and added the zipper, the jacket was too tight to do up. So the zipper had to be removed while I tried to work out how to make the jacket wider... and that's the reason for the black panels.

Saturday, November 7, 2009

2 heads + 2 heads = 4 hats

When you have twins, there are many things you do twice. But when you have twins AND your friend has twins, there are some things that you do four times.... like at the park when you try and quickly work out how the two of you can go in four directions! But in this case, it's a little less frantic. In this case, it's making four hats.

Using Nicole Mallalieu's Kids Hats pattern, I started with hats for my friend's girls. I tried to get my two to model them but this was the best shot I could get.


It seems that finding good hat models can be a challenge! So I found a more complient and less inquisitive pair to model the new hats.


This is a great pattern that is very easy to follow. The hats sit well on the kids' heads and they have a wide brim, which is excellent for protecting little faces from the sun. My friend's girls also think they are great for tea parties!


So that's two down, two to go. And given that the temperatures are hovering around 30°C in Melbourne at the moment, I had better get sewing.

Sunday, November 1, 2009

The Sort-of-Dress-Up Costumes

So while there was a certain appeal to leaving the kids like this for their cousin's 5th 'Come as your favourite jungle animal' birthday party ....


... I decided to make them something a little more practical and a little less material-thrown-over-children's-heads. I had romanic notions of creating my own super awesome costume but got tired of that idea pretty quickly after a few awful, awful attempts. Mr was getting ready to duck, still traumatised after the alleged house-throwing incident.

A late night panic session resulted in a less romantic but practical idea. My thinking was that a costume that went over clothes was likely to:
a) get in the way of serious playing (the party was at a park)
b) be hot (given that the forecast was for 28+ degrees)
c) be rejected with irrational crying

So I decided to play it safe, save my time and sanity, and followed a pattern. Thanks to Simplicity 5982, here is my little leopard and the cow she chased into the jungle.


The pattern didn't have tails so I just made a waistband, and used boning in the leopard tail to make it stick out and some fur on the bottom of the cow tail.


I will admit to googling "leopard tail" and "cow tail" to make sure they looked right. Attention to detail or ridiculous need for things to be right...?? You can decide!

Saturday, October 24, 2009

Some success and a beautiful quilt

It's amazing what a difference a fresh set of eyes can make. After stepping away from my frustrating refashioning project and looking at it again the next day, things fell into place. My thread sketched tree turned out just as I had imagined....


...I added a strip of black fabric around the hem and used the same idea on the right side of the neckline. I was having real trouble deciding how I would 'close' the top as I thought a brooch would be too much with the tree. A clever friend suggested the black tab which meant I was able to hide the snaps.


So all in all, my $1 Op Shop top turned out pretty well. I even wore it last night....


..... when I went to see the all-sewn-together quilt for Kootoyoo's The Quilt Project.

Image taken from The Quilt Project

I must admit to a "wow" when I walked into the room and saw the quilt. Even though I had seen many of the beautiful squares, together they even more beautiful. Kirsty has done an amazing job of coordinating this project and of making the squares into a quilt.


I couldn't help myself and even at the risk of being daggy, had to take a photo of my little part of this big project.

If you would like to see more of the quilt and read about all the people who sewed a little bit of their souls into this community project, take a visit to The Quilt Project website.

Monday, September 28, 2009

A Crown of Golden Trim

One of the many things I love about blogging is being challenged to do things I wouldn't have done otherwise. This is a perfect example. Gemma from Loz & Dinny set a great challenge with some unloved gold trim she was given. She wanted it to be loved!

So with a little bit of fabric stiffener and a little bit of love, my kids now have some new dress ups...


The crowns were made by stiffening the trim using Fabric Stiffener (thanks to Cam for her advice with getting this right). I used two rows of boning in the headbands and then covered them in the same fabric I used for the cape. To allow the crowns to fit on growing heads and make them easier to put on and off, there is a piece of elastic sewn into the back. I figured if you're going to wear a crown then you need a cape so I got an idea on how to make the cape from here. The outer fabric is upholstery fabric and the lining is satin. The cape does up with a snap so I can add another as the kids grow, and it will come apart easily and not choke them should an accident occur while playing. Which is important I think!

Thursday, September 24, 2009

My Creative Space - The Gold Trim Challenge

This week my space is all about Loz and Dinny and the fun challenge that Gemma has set. I have 80cm of gold trim to use 'in some crafty project to make it have its day basking in the sunshine of handmade'. What a cool brief!

So I have teamed the trim with a $1 piece of upholstery fabric from the Op Shop and some satin kindly given to me from my mother-in-law's stash. And I have until the 29th Sep to make this into something worthy of sunshine basking!


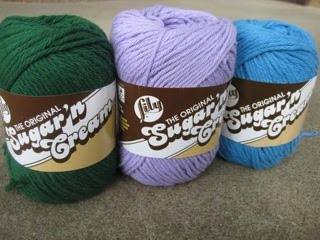
Also waiting for my attention are 3 balls of Sugar 'n Cream cotton. They desperately want to be made into knitted dishcloths and they will be, as soon as I have time in between wiping snotty noses (mine and the kids'), giving extra cuddles, driving children to sleep and trying to find some slither of sanity in my severely sleep-deprived, snot-filled mind!


I hope your house is a happy, healthy one with lots of creativity happening. Pop over to the Redwork Quilt Maker extrodinaire to see who is inviting you into their space this week.

Thursday, September 10, 2009

My Creative Space - Dishcloth & Plane

There is a dishcloth and a plane in my creative space this week. The dishcloth is an awesome present-for-no-reason from Julianne at Chasing Snails who has a mission of converting every single household over to handmade knitted dish cloths. Well let me tell you, I'm converted!


Converted so much that I have ordered some Sugar 'n Cream cotton from American Yarns and I plan on having a kitchen full of knitted dishcloths.... well not full because that would be silly, but certainly enough so that I always have a clean one ready. If you are keen to have some knitted dishcloths in your house, now is a great time because American Yarns is having a sale so head over to their Ravelry page to check it out.

So I wanted to say thankyou to Julianne for being awesome but what to do? She commented that she liked my nephew's planes so that was a start but I needed more. I first met Julianne when reading her blog post, Top 10 Lessons for Surviving a Zombie Attack. This appealled to me as I thought it was very funny, and I now feel more confident should zombies ever attack. It soon became apparent that Julianne has an interest in things a little creepy... so this is what I sent her...


While I'm not sure that I would board this plane, it was great to hear that she loved it... especially the skull!

If you're game, jump aboard Skull Air and fly over to Kirsty's to check in at more creative spaces.

Tuesday, September 1, 2009

My Creative Space - Black Jumper

Some more refashioning this week. The jumper I started with is different from last week's project as the wool is machine washable. Learning from previous lessons, I bought this one knowing that it could not be felted!

Here's what I did:
- chopped off the arms
- cut across the top just underneath the V collar
- took it in at the sides
- overlocked around the neckline
- took in the sleeves and reattached them (next time I will cut the armholes in a bit as the sleeves don't sit well on my shoulders)

I wanted it to be a bit longer and the sleeves were too short, so I cut up a woollen skirt I had also bought at the Op Shop (forgot to take a photo) and added about 12cm to the body length and sleeves.

Then I sewed random reverse darts on the front, back and sleeves. And that's it.


Grab a cuppa and see what creativeness is happening out there at Kootoyoo.....