Wednesday, December 23, 2009

A saved tree, another tradition and Merry Christmas

We didn't have a Christmas tree and didn't really want to buy one... real or artificial... for lots of reasons. But when my Mr and I drove past this dead tree lying on the side of the road, we knew we'd found our tree. It is different and odd and not what you would expect and we love it.


Hanging on it are decorations that have meaning to us including two new ones this year, the first of a new tradition (who would have thought that having children would make me get all tradition-y!) - each year we'll make a new decoration for the tree. This year, I made my two little reindeers. Next year my little reindeers might make their own.


Also on the tree are two little stockings made just for my reindeers. Thankyou Trixi. They did make it off the kids' fingers and onto the tree!


So all that's left to say is Merry Christmas and Happy New Year to you. Thank you for stopping by my 'place' this year. It has been amazing to meet so many wonderful people whose paths I would never have crossed until I started blogging. I hope you all enjoy the time spent with your special people, whatever you are doing and whatever you are celebrating. I look forward to chatting to you again in the new year. xxxx

Tuesday, December 15, 2009

Woof woof, woof woof

It's full steam ahead in the 'Handmade Christmas Present Department' over here at MBC Headquarters. On the finished list is Poppy and her Puppies for my dog-assessed niece.


My Poppy has 4 puppies, including twins. I thought my niece would think this was pretty special as her mum is a twin and she has twin cousins.


There is also lots of discussions with my niece at the moment about families and how they are all different.... just making sense of her changing world and the world around her (as we are all trying to do I guess!). So joining Poppy and her puppies is Mr Poppy.


This cute pattern is an Audrey & Maude design available from here and here. I made Mr Poppy at 100% and Poppy and the puppies at 90% of the original pattern. The pattern says to use felt for the ears, tail and legs but a lack of appropriate coloured felt and a need to get started and finished, resulted in machine sewn bits.


And a big thankyou to all the good wishes you guys sent me about getting back to work. It was ridiculous how nervous I was! This motherhood thing can do wonders for your self confidence in some areas, but it can take a battering in others. Anyway, I am happy to report that within a few minutes, it was like I had never left. I even wondered at one point if I had actually had children! So it all went well and it looks like I'll be doing some more work in the new year.

Thursday, December 3, 2009

My Creative Space - Recycled Musical Shaker

We had a hard rubbish collection round here not long ago, and when I saw an old vaccum cleaner on the side of the road, I was reminded of a session I went to at uni about making your own musical instruments. So I grabbed the vaccum cleaner hose and now we have some shakers for the kids to rock out with, with Mr on the guitar.

Here's how to do it....

You'll need a hose of some sort (I used a vaccum cleaner hose), electrical tape, rice or lentils or stones and a stanley knife.

Form a circle to decide the size of the shaker.

Cut it with the stanley knife. This is what you'll have.

Use the piece of paper to make a funnel to pour the rice/lentils/stones into the hose.

Cut about 3cm into one end of the hose. Be careful not to spill the rice/lentils/stones out the other end.

Cutting the end helps to push one end into the other end of the hose to form a circle.

Cover the join with electrical tape.

Wrap the tape around several times to make sure it's secure. You could tie ribbons or pieces of material on it for extra bling.

That's it. Not only does this reduce landfill by a little bit, the kids get to play with something they helped create and they can make beautiful-ish music! All they have to do is shake, shake, shake.


And it seemed that a bit of bouncing, jumping and rocking from side to side helps too!

For more spaces that are full of creative stuff, stop by Kirsty who is also making music...

Tuesday, December 1, 2009

Ready to play in the sun

It's all about hats, hats, hats round these parts at the moment. After making sure my friend's girls are ready for the sun, I finished off hats for my two kidlets.


Using Nicole Mallalieu's Kids Hat pattern again, these are made using lightweight denim with a band of fabric on the crown that matches the fabric used for the brim lining.


I've almost finished another two hats for a friend's kids and while I'm almost hatted out for this Summer, I can see my sewing skills have improved.... which is great for the next project....

Monday, November 30, 2009

A cuppa, some chocolate & MixTape

So today is starting well. The kids are in bed, the washing is on the line and I'm sitting down with a cuppa, some chocolate and the latest issue of MixTape.... and I have something to give you too!


This issue of MixTape is full of lots of cool stuff, including an article by Sooz about rules (yes, I too am embracing the wonk!) and instructions from Kirsty on how to make a Multi Tasker. I spent one very relaxing afternoon making one of these and they are great.


Now as a treat for me which becomes a treat for you, the lovely Justine from MixTape has given me two copies of Issue 11 to giveaway. So to get your hands on one, tell me what you think is great about a mag dedicated to all things craft and cool?

I'll choose two people to send the mags to on Friday 4th. But don't wait until then to sit down yourself with a cuppa and some chocolate! Have a great week.....

***Giveaway has now closed***
Congratulations to Vic and Kat who have a copy of MixTape heading their way.

Thursday, November 26, 2009

My Creative Space - Birthday Bunting

This week, it's about a birthday, a bunting and a new family tradition.

It was my Mr's birthday on Monday and a surprise arrival from Gina helped me make an idea that had been floating around in my head into something real .... a Birthday Bunting.


Each family has their own traditions, some we grew up with and some that begin with us. My Mum used to let us decide what was for dinner on our birthdays... this is a tradition I loved and look forward to carrying on with my children. And this bunting - that will be dragged out and hung for all our birthdays - is our new family tradition.

For more creative spaces, head over to visit Kirsty who needs a little TLC today.

Sunday, November 22, 2009

Just because

One of the truly lovely things about blogging is the "just because".

The kind words left in comments.... just because.
The supportive, funny and 'knowing' emails.... just because.
The things that arrive in the mail... just because.

The other week I stopped by Midge & Judy. Michelle had been busy busy preparing for Christmas and I left a comment, impressed with her marathon effort. Well I happened to leave her 300th comment, so she made these collecting satchels for my kids..... just because. They are to take on walks to collect stuff and are great! The embroidered shells are beautiful and I especially love the gold thread french knots. We were all set to go collecting today but after a week of hot weather, the rain kept us inside.


Another day, I visited Angie at 3 Red Buttons who is making her boy a backpack (a cool pattern which I also had to buy). I told her that I thought the truck fabric was AWESOME... so she sent me some - and some cool clouds and rainbows too - just because. The truck fabric is currently being carried from here to there and laid out as we look and point at every truck!


And the delicious Cathie from the delicious Melbourne Epicure had a giveaway to celebrate her 100th post. I was lucky enough to win a set of gingerbread family cookie cutters and a mini rolling pin.

But knowing that there are two little people in my house, Cathie sent me two sets.... just because.


I have been blogging for a while now, yet I am continually amazed by the kindness, generosity and friendships I have found since I became "Nikki from My Black Cardigan".

Thankyou to Michelle, Angie and Cathie for..... well..... just because!

Thursday, November 19, 2009

My Creative Space - My Baby Doll

This is my baby doll and highchair from when I was small. She is well travelled, moving interstate and spending time packed away in the roofs of 5 houses as my parents moved around. I am very grateful that despite having to lug four lots of cradles, highchairs and dolls from house to house, my parents never thought of getting rid of these.

So as my kids are now starting to pretend, it was time for "I can't remember her name*" to come down from the roof.


The kids do a great job of keeping her well fed and making sure she has lots to drink.....


but still, she's in a bad way. Her stuffing has flattened making her way too floppy, she needs a good wash....


....and a bad position in the plastic container has left her head a little oddly shaped.... making her look just a bit too creepy. I apologise to those who will now have trouble getting to sleep tonight! But on the plus side, look how happy she is within herself!


So after her success with Webster, Dr B Cardigan has been paged and the operating theatre (aka washing machine/sewing machine) is being prepared.

For more creativeness, head over to visit Kirsty who is settling into her new space.


From last week: Issue 10 of MixTapeZine is on its way to Teddy Bear's Wednesday.

*OK, I'll admit it. She wasn't a favourite! I do remember my Cabbage Patch Doll's name was Eartha Ivy.

Sunday, November 15, 2009

THE Suit

So when I first said it was a man-sized challenge, I wasn't wrong. It was a big ask. And there was a few hiccups along the way. But you know what, I think it worked.

Photo by Jamie Troi


Here's what I did (the short version**):

- removed the suit collar and added a larger, black collar
- cut some padding out of the shoulders
- removed the jacket pockets and zigzaged them closed
- cut off the buttons and button holes and added black panels to the front
- shortened the jacket and added a zipper
- thread sketeched buildings on the front of the jacket and on the bottom of the left leg of the pants
- sewed a black panel on the bottom of the right leg of the pants


Now before you go thinking I am the girl who cried wolf, panicking that first my top was ruined then worked out, and then that the suit was ruined then worked out.... this refashioning thing can be tricky. Satisfying but also very frustrating. I love the freedom of not sewing to a pattern but that can also be hard when something goes wrong. On both occasions, I really thought what I had done was beyond saving. So the lesson learnt for me is that I must not panic when refashioning. It is likely that things will turn ugly before falling into place.


So anyway, the gig was awesome and My Mr looked great! He loved the suit and even mentioned it on stage. I was very chuffed and even blushed a little!


** the long version involves removing the collar then sewing it up without a collar, making a round neck, collarless jacket that looked like something my mum would wear. Now my mum dresses well, but never ever do I want my husband to dress like my mother. So after lots of looking and thinking and cursing and then a fresh set of eyes, I cut the neckline deeper and added the black collar. And you know those black panels that were added to the front, that was because when I cut off the buttons and button holes and added the zipper, the jacket was too tight to do up. So the zipper had to be removed while I tried to work out how to make the jacket wider... and that's the reason for the black panels.

Thursday, November 12, 2009

My Creative Space - The Sorting Game

A few posts back, I made up a board to sort and play with some dinosaur toys the kids have. I got the idea from a friend so I decided to make up a game for her kids.

Because she doesn't have dinosaurs, I made up a set of 4 shapes - circles, triangles, squares and rectangles - in 4 colours - red, blue, yellow and purple.

Similar to the dinosaur game, on one side of this game board, there are 4 white shapes. This side is used to identify the different shapes and sort them by type.


On the other side are 4 coloured blobs. This side is used to sort the shapes into the different colours.


Like last time, this game board is made from plywood wrapped in one of the kids' old fleece blankets, then covered with black fabric.

I also made a bag to store the board and shapes so:
- they don't get lost
- my friend doesn't curse me when she finds little shapes all over her house (not that she would ever curse me!)


This game is easy to make and could be made from scraps and recycled/thrifted materials. I had plywood left over from another project but an old wooden/cork placemat would work just as well.

I love this game because it is handmade, can be played with 1 or more kids and has some learning involved. I also like to imagine it is fun! Like the dinosaur game, I have plans to make a dice and can see potential for different games using the board and shapes.

For more creative spaces, head on over to visit Kirsty who is getting all excited about making things in her new house.


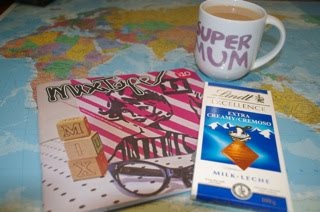
And because I'm silly, I have an extra copy of MixTape Issue 10 (the current issue for a few more days!). I'll randomly choose a comment and send the issue to that person. If it's you and you already subscribe, then you can let me know I'll choose someone else. MixTape is great, especially when read while lying on the couch with a cuppa or coffee or other drink of your choice! If you want to subscribe to MizTape, you can here.

Monday, November 9, 2009

Not so good

WARNING:
This post contains an implication of explicit language.


___________________________


I think I may have f***ed up the suit.